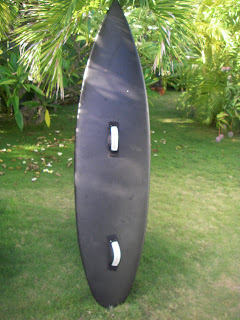
So after using this twice, the board has great pop, and a little too much snap...
I snapped the board in half. The only positive thing was that the tee-nuts held in fine and the board didn't snap at the footstraps, so the technique below is still valid and i'll leave it up, but you need a stronger board.
Here's how I added tee-nuts into an old surfboard to make a kite-surfing board.
The first thing is to make sure you don't put the footstraps too far back. I made this mistake when i bought a set of surftech 'strap-pads'.
By the way, these cost a fortune and the glue on them is terrible so they didn't stay on. Besides that, when i tried to get up on the board the foot placing for a kitesurf board is Not the same as where you'd stand on a surfboard. Most kitesurfers probably know this. I learned.
So rip off those crap surftech pads, which are probably coming unstuck by this point anyway, but don't worry you can still use the straps. Still, $150 wasted - I don't recommend the strap/pad combination. I've put on a thousand deck pads and I know the correct procedure, so I didn't just kook it, in my opinion the pads are genuinely poorly designed. So Annyyway, do this instead...
Firstly, dig around in the garden and find an old surfboard. This one was perfect, it's an old JC
 e
e poxy that's beaten to hell and was used hard for about 5 years. Owes me nothing so it's going to get a new lease of life. Polyurethane surfboards are probably a bit fragile on the deck for use as kiteboards, although plenty of people seem to use them. If you were to use a PU board, I'd sand the deck and put down a layer or two of 6oz glass, after putting in the tee-nuts.
Secondly, you need to figure out where you want your holes. I've shown a tape measure in the picture so you can see the spacing. This is wider than I'd put on my standard twin tip - about 25 inches, and further toward the nose than I'd stand on a surfboard. The back foot straddles the front two fins, I'd typically like my back foot over the back fin if I were regular surfing.
The main thing is that your feet are over the flattest part of the board - the area with the least rocker.

Thirdly, get your 1" hole cutter, take a deep breath, and drill your holes. The sandwich construction lies over foam, which you just cut into for the correct depth for the T-nuts (5/16").
Then use the same method I used for the twin tip and fill the holes with epoxy.
Remember to sand down the deck and side walls of the holes so the epoxy adheres well. I thought about a layer of 6oz cloth around each nut as well, but they seem pretty solid so didn't bother, if they pull out I'll do that then.

 After they dry, sand back flush and paint.
I sanded the entire surfboard which took forever. Use acrylic paint, apparently. I'm still not completely convinced by this one, since the paint appears to have a dust film on it, which is still coming off. Not sure if i was meant to also epoxy over the final coat or not, but forget it, I'll try it like this for a while.

Anyway, then I sprayed it black and it looks awesome. The Mad Max look is at least better than the 'Shane Dorian tequila sunrise' shite that it came with.
 Sprayed the bottom off-white so I could turn it upside down on my kite without the sun baking it to toast and expanding all the foam inside.
Attach the straps and go kitesurfing.
Board snapped session two...

Oj


This post is awesome..i've been reading tons of crap posts from other blogs, but shows you have a more educated reader base. kite boards
ReplyDelete