I gathered the information to make a board from various places...
General Info
Soo much information on board making here, search before you ask...
Swaylocks
Kite board forum board builders
Paul Jarvis made a nice board using PVC foam rails, Corcell foam and epoxy...
Has great information and good, clear description of the process.
I want to start working with carbon fiber, figure you could make a fin easily using this technique...
Carbon Propeller
Plywood boards
Got a few good ideas here:
DIY Kiteboard
This guy is classic, really focuses on simplicity - flat ply with no fins... innovator and gave me loads of ideas.
Plywood boards
Videos
These guys have some good instructional videos on t-nut inserts, glassing, etc.
JamestownTV
At some point I'm going to make my own fins. (You tube fin making video)
Friday, July 3, 2009
Introduction
Firstly, a few caveats. Take everything I say with a pinch of salt, these are just my ideas thrown together. I don't really know what I'm doing in terms of either kite surfing or board making, I just decided I didn't want to spend $600 on a board that was made for $50 and I'm learning a lot in the process.
I'm a UK citizen living in Hawai'i, cause the weather's awesome and surf is better.
What this means is that my body and soul want to work in metric but my life and mind are now in imperial. I'll try and keep it consistent, but seriously, it's not hard to do the conversion.
1 inch * 0.3937008 = 1 cm
1 cm * 2.54 = 1 inch
If you've forgotten how to use a calculator, type '4 cm in inches' into google and you'll get the desired result.
Tools you want:
A Jigsaw is really a requirement- it'll take forever to get that nice first cut doing this by hand. Just get one - I didn't but I borrowed one off my neighbor.
A Drill - doesn't need to be cordless. you're going to have power cords everywhere with the sander, anyway so don't bother spending double the cash for a drill that runs out every 5 minutes.
A Planer is nice, but not really necessary
An Electric Sander - orbital is best, but I don't have one.
A Right Angle
A Level
Tape Measure
A Workbench (I use my lawn and a few boxes)
Clamps
A Very Sharp Knife
Painters Tape
Measuring Cups
Cheap Paint Brushes
Mixing Tongue Depressors
Rubber Gloves
Dust Mask
Goggles
Sand Paper - 60, 220, 400 and 620 in that order, except i never get around to the 620 polish, cause at that point it's just aesthetic and the wind came up.
1 Inch Hole Cutter
1/4" & 5/16"Drill Bit
Materials
Epoxy and hardener - I use about 4-5oz to 'wet' the wood per side, plus about 6oz per sheet of fiberglass.
6oz fiberglass cloth.
4ft x 8ft, 1/4" birch plywood. Birch is nice but any decent quality is good. Personally I think it's a waste of money to use marine ply as you're doing to spackle (wet) the wood with epoxy anyway.
Whatever colour pigment you want.
Rice paper for any design you want, to use this, simply painters-tape a piece to a normal piece of paper and you can print on it any design you like .
.
At least four 10-32 stainless steel tee nuts, if you want a handle and multiple foot positions, just get more tee-nuts. Don't cheap out and get zinc, they'll rust out in days, these stainless steel ones are about $1.50 each (I like the 10/32", 1/4" are unnecessarily large): these are the perfect ones...
I'm a UK citizen living in Hawai'i, cause the weather's awesome and surf is better.
What this means is that my body and soul want to work in metric but my life and mind are now in imperial. I'll try and keep it consistent, but seriously, it's not hard to do the conversion.
1 inch * 0.3937008 = 1 cm
1 cm * 2.54 = 1 inch
If you've forgotten how to use a calculator, type '4 cm in inches' into google and you'll get the desired result.
Tools you want:
A Jigsaw is really a requirement- it'll take forever to get that nice first cut doing this by hand. Just get one - I didn't but I borrowed one off my neighbor.
A Drill - doesn't need to be cordless. you're going to have power cords everywhere with the sander, anyway so don't bother spending double the cash for a drill that runs out every 5 minutes.
A Planer is nice, but not really necessary
An Electric Sander - orbital is best, but I don't have one.
A Right Angle
A Level
Tape Measure
A Workbench (I use my lawn and a few boxes)
Clamps
A Very Sharp Knife
Painters Tape
Measuring Cups
Cheap Paint Brushes
Mixing Tongue Depressors
Rubber Gloves
Dust Mask
Goggles
Sand Paper - 60, 220, 400 and 620 in that order, except i never get around to the 620 polish, cause at that point it's just aesthetic and the wind came up.
1 Inch Hole Cutter
1/4" & 5/16"Drill Bit
Materials
Epoxy and hardener - I use about 4-5oz to 'wet' the wood per side, plus about 6oz per sheet of fiberglass.

6oz fiberglass cloth.
4ft x 8ft, 1/4" birch plywood. Birch is nice but any decent quality is good. Personally I think it's a waste of money to use marine ply as you're doing to spackle (wet) the wood with epoxy anyway.
Whatever colour pigment you want.
Rice paper for any design you want, to use this, simply painters-tape a piece to a normal piece of paper and you can print on it any design you like
 .
.At least four 10-32 stainless steel tee nuts, if you want a handle and multiple foot positions, just get more tee-nuts. Don't cheap out and get zinc, they'll rust out in days, these stainless steel ones are about $1.50 each (I like the 10/32", 1/4" are unnecessarily large): these are the perfect ones...

Thursday, July 2, 2009
Adding footstraps to a surfboard.

So after using this twice, the board has great pop, and a little too much snap...
I snapped the board in half. The only positive thing was that the tee-nuts held in fine and the board didn't snap at the footstraps, so the technique below is still valid and i'll leave it up, but you need a stronger board.
Here's how I added tee-nuts into an old surfboard to make a kite-surfing board.
The first thing is to make sure you don't put the footstraps too far back. I made this mistake when i bought a set of surftech 'strap-pads'.
By the way, these cost a fortune and the glue on them is terrible so they didn't stay on. Besides that, when i tried to get up on the board the foot placing for a kitesurf board is Not the same as where you'd stand on a surfboard. Most kitesurfers probably know this. I learned.
So rip off those crap surftech pads, which are probably coming unstuck by this point anyway, but don't worry you can still use the straps. Still, $150 wasted - I don't recommend the strap/pad combination. I've put on a thousand deck pads and I know the correct procedure, so I didn't just kook it, in my opinion the pads are genuinely poorly designed. So Annyyway, do this instead...
Firstly, dig around in the garden and find an old surfboard. This one was perfect, it's an old JC
 e
e poxy that's beaten to hell and was used hard for about 5 years. Owes me nothing so it's going to get a new lease of life. Polyurethane surfboards are probably a bit fragile on the deck for use as kiteboards, although plenty of people seem to use them. If you were to use a PU board, I'd sand the deck and put down a layer or two of 6oz glass, after putting in the tee-nuts.
Secondly, you need to figure out where you want your holes. I've shown a tape measure in the picture so you can see the spacing. This is wider than I'd put on my standard twin tip - about 25 inches, and further toward the nose than I'd stand on a surfboard. The back foot straddles the front two fins, I'd typically like my back foot over the back fin if I were regular surfing.
The main thing is that your feet are over the flattest part of the board - the area with the least rocker.

Thirdly, get your 1" hole cutter, take a deep breath, and drill your holes. The sandwich construction lies over foam, which you just cut into for the correct depth for the T-nuts (5/16").
Then use the same method I used for the twin tip and fill the holes with epoxy.
Remember to sand down the deck and side walls of the holes so the epoxy adheres well. I thought about a layer of 6oz cloth around each nut as well, but they seem pretty solid so didn't bother, if they pull out I'll do that then.

 After they dry, sand back flush and paint.
I sanded the entire surfboard which took forever. Use acrylic paint, apparently. I'm still not completely convinced by this one, since the paint appears to have a dust film on it, which is still coming off. Not sure if i was meant to also epoxy over the final coat or not, but forget it, I'll try it like this for a while.

Anyway, then I sprayed it black and it looks awesome. The Mad Max look is at least better than the 'Shane Dorian tequila sunrise' shite that it came with.
 Sprayed the bottom off-white so I could turn it upside down on my kite without the sun baking it to toast and expanding all the foam inside.
Attach the straps and go kitesurfing.
Board snapped session two...

Oj

Kiteboard 002, twin tip, 150 * 40
Ok, this is my second attempt at a board from scratch.
The first was a plank of 1/2" ply, glass with epoxy. Took me about 5 minutes before I realised it was too thick, too short, and too heavy. yeah yeah, story of my life. So here's # two.
So firstly figure out what you want to make.
I found a great excel file using the equation of an ellipse which is perfect - translated from Saucisseman great idea.
Simply use the spreadsheet to calculate the width at 5cm distances along the length from the center point of the board. This one cuts the ends square, but go to the end if you want rounded ends.
This is going to be 150cm *40cm - it's nice and long since i'm just beginning kite surfing and want to get up and going easy.
SO.. plywood. I bought a 4ft by 8ft, 1/4" Birch from Hardware Hawai'i. They tried to convince me they didn't have any, and even disagreed with me when I showed them that they had it. Eventually they let me give them money for it. Weird. Anyway... the wood...

Take your time during this step.
Use the right angle and measuring stick or tape to mark out the ellipse along the length of the wood...
 Hopefully you can see here, i've marked out the wood like an american football pitch - then drawn a line between the points, making a pretty good ellipse... x marks the cut.
If the line between the points doesn't look smooth, measure again. Time spent here will save you time and irritation later - get the measurements right!

Cut the wood along the line, using your electric jig-saw.
 Do it all again! Make a smaller piece, using the spreadsheet again. This second piece will be stuck on top of the larger piece. This will add strength and rigidity to the core of the board.
The more similar in length the two pieces are, the more stiff the board will be.
You may have noticed that the 1/4" seems really flexible at this point. It is, this board is very felxible at this length... it's a protoype, what can I say?
 I planed the edges of the top and bottom piece, to taper them down toward the rails.
You don't really have to do this on the bottom piece, but definitely do on the top.
You want to reduce the 'step' between the top and the bottom piece so it's easier to glass.
 I used normal woodglue, after sanding with 60 grit, to glue the two pieces together.
I actually clamped it to the first board I made... at least it's good for something.
Put shims under either end to force the rocker into it -see next photo.
I wet the wood, clamped it, let it dry, and then glued them together to force the rocker, however i think if you glued and clamped it together while the glue was wet, it would dry with the rocker in tact.
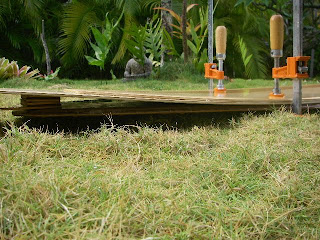 This photo shows the two pieces of wood clamped to the old board with shims to force the rocker.
I didn't get a photo, but I used a load of weights and stuff to hold the top piece down. You definitely want to make sure there's a good bond between the two pieces.
Once the wood glue has dried you need to cut the holes for the tee-nuts. These are threaded nuts that you screw your bolts into, to hold your footstraps and handle.

Firstly figure out your foot position. The standard foot position is about 21-23 inches. If you're new to this, like me, jump in the air a few times and measure the distance between your feet. Alternatively make a template from another board. It's a good idea to have already bought your footpads, straps and handle at this point as you want to make sure they'll fit on your board. The spacing is fairly standard, but not exact.
Use your 1 inch hole cutter to cut the holes in the top of the board. I only cut 4 holes as I'm not adding a handle, but do whatever you're comfortable with, you can put as many foot strap positions, handles, bells and whistles as you like. I just like to keep it simple.
I made a template for the foot holes from a commercial kite board.
 Cut your holes the depth of the tee-nuts (about 5/16" for these) I drew a measured line on my hole cutter so i didn't go too deep. Here's a nice youtube video of the process which I copied exactly... except without the drill press. I want a drill press.
Use painters tape to cover the holes and cut out the holes with your knife, half-fill the holes with epoxy and place the tee-nuts in, with the bolts inserted, then fill the hole to the brim, trying to avoid getting epoxy all over the nuts and bolts. If you do get epoxy into the tee-nuts, don't worry, just buy a hole tap and tap out the threads again
Glassing : Use Gloves always and a mask when sanding.
 Ok, if you've never glassed anything before, I'm not going to go into every detail of the process here, but this is a really easy way to start. Just remember to sand everything before painting, sticking, glassing or doing anything that touches anything.
1. I used a paintbrush to paint on 4 oz of epoxy. Allow this to dry
2. Sand it roughly - 60 grit.
3. Lay 6 oz fiberglass cloth , about an inch or two larger than the board and make sure there are no kinks or anything to snag the cloth
4. Use about 6-8oz of epoxy and pour onto the cloth, using a squeegee and or paintbrush to push all the air out and make sure the cloth is well coated, but without leaving any globules. The weave will probably show through. Leave till TACKY, NOT DRY
5. Use another 4oz of epoxy to fill in the weave for a smooth finish.
If you do leave it too long, simply wait till it's completely dry and rough sand again before adding the last 4oz to fill in the weave.
6. Allow the whole shabang to dry, cut off the edges and sand at 60 grit.
 Then turn it over and do the same.
I added two layers of 6oz to the top, which means simply following the above steps, 1-4, then instead of filling in the weave, sand the first layer and repeat step 4 on the dry, sanded glass.
 REPEAT step 4, then fill in the weave with pigmented epoxy.
The difference between the top and the bottom is that the top has a step in it, which just requires patience and make sure you squeegee the fiberglass well into the step, and the tee-nuts. Cram the tee-nut holes with surf wax, candle wax or cover them with tape, then before the glass gets too dry, just cut out the nut-hole with your knife. Screwing your bolts into the nuts will squeeze out any wax, so you can do this later when everything is dry.
I made a miserable mess of the top of my board, when experimenting with fitting the tee-nuts, so I decided to pigment the epoxy white.
I then realised this is probably dumb since breaking waves are also white but ho-hum if i loose it I'll make another. Colour is great for covering all the things you've ^%&#'d up along the way
Now for the fin holes.
Most standard US fins have two, 1/4", threaded holes, 1.5 inches apart, some have a third hole between them. Buy your fins before cutting your fin holes as this way you can make a template and you know you're cutting them in the right place. I used an old kite board to measure where the fins are placed with respect to the tail, rail and nose of the board. Steal a mates board and make a template with paper to get this right.
When making holes the idea is to leave no bare wood exposed to water, so the holes ultimately need to be lined with epoxy. This is how I did it:
 Use a 5/16" drill bit, assuming the fins you've got use 1/4" bolts.
Drill out the holes in the desired place with the 5/16" bit, then use painters tape, like you did with the tee-nuts, but covering the bottom of the hole.
Fill the holes with epoxy.
Let the epoxy dry.
Sand back the excess epoxy.
Measure again, making sure the spacing is correct and drill a small pilot hole through the epoxy.
 Measure AGAIN, then drill the 1/4" hole.
If you've measured correctly, the fins should fit perfectly, and the 1/4" hole you drilled should be lined with epoxy with no bare wood showing.
Sorry, forgot to take a photo, but here's one of the original board I made with the same technique used for the fins...
Here's the youtube video that I copied for ideas...
Finishing off.

Finish the board off by sanding back (60g), then 200, then 420 grit, which gave a pretty smooth finish.
Yes, the sanding takes a while, just suck it up. Eventually when i make the next board I'll probably sand the wood side to a real polish, but the wind came up so i wanted to try the board rather than sit in my garden sanding all afternoon.
Basically that's it. Attach your pads, straps and fins and go.
I've used this board about 10 times now, and it works great for me, as a beginner board. It may be a little too flexible and not strong enough for better riders, doing airs and that sort of thing, but by the time i get to that stage, I'll be ready to make my next one anyway. Go make your own.


The first was a plank of 1/2" ply, glass with epoxy. Took me about 5 minutes before I realised it was too thick, too short, and too heavy. yeah yeah, story of my life. So here's # two.
So firstly figure out what you want to make.
I found a great excel file using the equation of an ellipse which is perfect - translated from Saucisseman great idea.
Simply use the spreadsheet to calculate the width at 5cm distances along the length from the center point of the board. This one cuts the ends square, but go to the end if you want rounded ends.
This is going to be 150cm *40cm - it's nice and long since i'm just beginning kite surfing and want to get up and going easy.
SO.. plywood. I bought a 4ft by 8ft, 1/4" Birch from Hardware Hawai'i. They tried to convince me they didn't have any, and even disagreed with me when I showed them that they had it. Eventually they let me give them money for it. Weird. Anyway... the wood...

Take your time during this step.
Use the right angle and measuring stick or tape to mark out the ellipse along the length of the wood...
 Hopefully you can see here, i've marked out the wood like an american football pitch - then drawn a line between the points, making a pretty good ellipse... x marks the cut.
If the line between the points doesn't look smooth, measure again. Time spent here will save you time and irritation later - get the measurements right!

Cut the wood along the line, using your electric jig-saw.
 Do it all again! Make a smaller piece, using the spreadsheet again. This second piece will be stuck on top of the larger piece. This will add strength and rigidity to the core of the board.
The more similar in length the two pieces are, the more stiff the board will be.
You may have noticed that the 1/4" seems really flexible at this point. It is, this board is very felxible at this length... it's a protoype, what can I say?
 I planed the edges of the top and bottom piece, to taper them down toward the rails.
You don't really have to do this on the bottom piece, but definitely do on the top.
You want to reduce the 'step' between the top and the bottom piece so it's easier to glass.
 I used normal woodglue, after sanding with 60 grit, to glue the two pieces together.
I actually clamped it to the first board I made... at least it's good for something.
Put shims under either end to force the rocker into it -see next photo.
I wet the wood, clamped it, let it dry, and then glued them together to force the rocker, however i think if you glued and clamped it together while the glue was wet, it would dry with the rocker in tact.
 This photo shows the two pieces of wood clamped to the old board with shims to force the rocker.
I didn't get a photo, but I used a load of weights and stuff to hold the top piece down. You definitely want to make sure there's a good bond between the two pieces.
Once the wood glue has dried you need to cut the holes for the tee-nuts. These are threaded nuts that you screw your bolts into, to hold your footstraps and handle.

Firstly figure out your foot position. The standard foot position is about 21-23 inches. If you're new to this, like me, jump in the air a few times and measure the distance between your feet. Alternatively make a template from another board. It's a good idea to have already bought your footpads, straps and handle at this point as you want to make sure they'll fit on your board. The spacing is fairly standard, but not exact.
Use your 1 inch hole cutter to cut the holes in the top of the board. I only cut 4 holes as I'm not adding a handle, but do whatever you're comfortable with, you can put as many foot strap positions, handles, bells and whistles as you like. I just like to keep it simple.
I made a template for the foot holes from a commercial kite board.
 Cut your holes the depth of the tee-nuts (about 5/16" for these) I drew a measured line on my hole cutter so i didn't go too deep. Here's a nice youtube video of the process which I copied exactly... except without the drill press. I want a drill press.
Use painters tape to cover the holes and cut out the holes with your knife, half-fill the holes with epoxy and place the tee-nuts in, with the bolts inserted, then fill the hole to the brim, trying to avoid getting epoxy all over the nuts and bolts. If you do get epoxy into the tee-nuts, don't worry, just buy a hole tap and tap out the threads again
Glassing : Use Gloves always and a mask when sanding.
 Ok, if you've never glassed anything before, I'm not going to go into every detail of the process here, but this is a really easy way to start. Just remember to sand everything before painting, sticking, glassing or doing anything that touches anything.
1. I used a paintbrush to paint on 4 oz of epoxy. Allow this to dry
2. Sand it roughly - 60 grit.
3. Lay 6 oz fiberglass cloth , about an inch or two larger than the board and make sure there are no kinks or anything to snag the cloth
4. Use about 6-8oz of epoxy and pour onto the cloth, using a squeegee and or paintbrush to push all the air out and make sure the cloth is well coated, but without leaving any globules. The weave will probably show through. Leave till TACKY, NOT DRY
5. Use another 4oz of epoxy to fill in the weave for a smooth finish.
If you do leave it too long, simply wait till it's completely dry and rough sand again before adding the last 4oz to fill in the weave.
6. Allow the whole shabang to dry, cut off the edges and sand at 60 grit.
 Then turn it over and do the same.
I added two layers of 6oz to the top, which means simply following the above steps, 1-4, then instead of filling in the weave, sand the first layer and repeat step 4 on the dry, sanded glass.
 REPEAT step 4, then fill in the weave with pigmented epoxy.
The difference between the top and the bottom is that the top has a step in it, which just requires patience and make sure you squeegee the fiberglass well into the step, and the tee-nuts. Cram the tee-nut holes with surf wax, candle wax or cover them with tape, then before the glass gets too dry, just cut out the nut-hole with your knife. Screwing your bolts into the nuts will squeeze out any wax, so you can do this later when everything is dry.
I made a miserable mess of the top of my board, when experimenting with fitting the tee-nuts, so I decided to pigment the epoxy white.
I then realised this is probably dumb since breaking waves are also white but ho-hum if i loose it I'll make another. Colour is great for covering all the things you've ^%&#'d up along the way
Now for the fin holes.
Most standard US fins have two, 1/4", threaded holes, 1.5 inches apart, some have a third hole between them. Buy your fins before cutting your fin holes as this way you can make a template and you know you're cutting them in the right place. I used an old kite board to measure where the fins are placed with respect to the tail, rail and nose of the board. Steal a mates board and make a template with paper to get this right.
When making holes the idea is to leave no bare wood exposed to water, so the holes ultimately need to be lined with epoxy. This is how I did it:
 Use a 5/16" drill bit, assuming the fins you've got use 1/4" bolts.
Drill out the holes in the desired place with the 5/16" bit, then use painters tape, like you did with the tee-nuts, but covering the bottom of the hole.
Fill the holes with epoxy.
Let the epoxy dry.
Sand back the excess epoxy.
Measure again, making sure the spacing is correct and drill a small pilot hole through the epoxy.
 Measure AGAIN, then drill the 1/4" hole.
If you've measured correctly, the fins should fit perfectly, and the 1/4" hole you drilled should be lined with epoxy with no bare wood showing.
Sorry, forgot to take a photo, but here's one of the original board I made with the same technique used for the fins...

Here's the youtube video that I copied for ideas...
Finishing off.

Finish the board off by sanding back (60g), then 200, then 420 grit, which gave a pretty smooth finish.
Yes, the sanding takes a while, just suck it up. Eventually when i make the next board I'll probably sand the wood side to a real polish, but the wind came up so i wanted to try the board rather than sit in my garden sanding all afternoon.
Basically that's it. Attach your pads, straps and fins and go.
I've used this board about 10 times now, and it works great for me, as a beginner board. It may be a little too flexible and not strong enough for better riders, doing airs and that sort of thing, but by the time i get to that stage, I'll be ready to make my next one anyway. Go make your own.


Subscribe to:
Posts (Atom)
